
12:07:21 am 06/26/2026
Viewed: 46
RYOBI RM300e – KELLY KDS 48V RETROFIT GUIDE
This guide explains how to replace the discontinued OEM traction controller in the Ryobi RM300e with a Kelly KDS48100E 48V DC motor controller. This restores full drive functionality while keeping the OEM blade system and safety switches.
PARTS LIST:
Core Components:
1. Kelly KDS48100E motor controller
2. Kelly USB programming cable
3. 0–5V Hall throttle (thumb or pedal style)
4. 48V main contactor (Tyco EV200 or Albright SW180 recommended)
5. 48V precharge resistor (100–200 ohm, 10 watt)
6. 48V main fuse (150–200 amp ANL or Class‑T)
Wiring and Connectors:
7. 2 AWG or 4 AWG battery cables
8. 8–14 AWG control wiring
9. Ring terminals, heat shrink, wire loom
10. Waterproof switch housings
Switches:
11. Forward/Reverse rocker switch (ON‑OFF‑ON)
12. Seat switch (reuse OEM)
13. Brake switch (reuse OEM)
14. Key switch (reuse OEM)
Mounting:
15. 1/8 inch aluminum plate
16. Rubber vibration isolators
17. Thermal pad or thermal compound
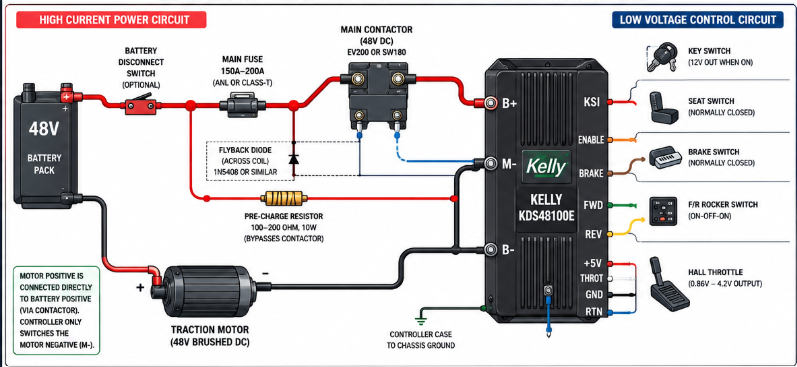
WIRING OVERVIEW
HIGH CURRENT PATH:
Battery positive → Main fuse → Main contactor → Kelly B+
Kelly M+ → Traction motor positive
Traction motor negative → Kelly M‑
Kelly B‑ → Battery negative
LOW VOLTAGE CONTROLS:
Key switch → KSI input
Seat switch → Enable input
Brake switch → Brake input
Forward/Reverse switch → Forward input and Reverse input
Throttle (0–5V Hall) → +5V, Signal, Ground
KELLY CONTROLLER PROGRAMMING SETTINGS
Motor Type: Brushed DC
Voltage: 48V
Current Limit: 100A continuous, 300A peak
Throttle Type: 0–5V Hall
Throttle Deadband: 5 percent
Throttle Curve: Linear
Acceleration Ramp: 1.2 seconds
Deceleration Ramp: 0.8 seconds
Reverse Speed Limit: 50 percent
Regen Braking: Enabled
Regen Current: 25 amps
Low Voltage Cutoff: 42V
High Voltage Cutoff: 60V
Enable Input: Seat switch
Brake Input: Brake switch
Precharge: Enabled, 0.5 seconds
MOUNTING PLAN
Mount the Kelly controller where the OEM controller was located.
Use an aluminum plate for heat spreading.
Install rubber isolators between the plate and mower frame.
Use a thermal pad between the controller and plate.
Route high‑current cables on the right side.
Route low‑voltage control wires on the left side.
Keep throttle wires away from motor cables to avoid electrical noise.
SAFETY LOGIC FLOW
Key ON
Seat switch closed
Brake released
Forward or Reverse selected
Throttle applied
→ Motor output enabled
COMMISSIONING CHECKLIST
Power up with motor disconnected.
Verify controller powers on and throttle voltage reads correctly.
Test safety switches.
Seat open = no drive.
Brake applied = no throttle response.
Lift rear wheels and test:
Forward
Reverse
Regen braking
Ground test:
Drive slowly, check smoothness, adjust throttle ramp and regen as needed.
OPTIONAL UPGRADES
Soft‑start throttle curve
Adjustable regen braking
Three‑mode speed switch (Eco, Normal, Sport)
Bluetooth tuning module
The total cost will be $550–$750 and the total time of labor if you have some experience with wiring up vehicles will be 4-6 hours.
CREDITS
The total cost will be $550–$750 and the total time of labor if you have some experience with wiring up vehicles will be 4-6 hours.
CREDITS
Compiled by Mitchell J. Stein – PWSA / RM300e Retrofit Research
Created for community sharing and educational use.
0
Comments
Log in to add a comment.